微服务网关接入限流服务器
微服务网关支持接入第三方限流服务器,本文档演示使用默认的限流服务器的步骤。
前提条件
选用限流服务器
你可以选择默认的限流服务器,也可以自己接入一个。
默认的限流服务器
直接应用提供的限流服务器模板,具体逻辑可参考限流服务器代码。
默认的限流服务器
---
# NOTE: this deployment is intended for demonstrating global
# rate limiting functionality only and should NOT be considered
# production-ready.

apiVersion: apps/v1
kind: Deployment
metadata:
  labels:
    app: ratelimit
  name: gateway-rls
spec:
  replicas: 1
  strategy:
    type: RollingUpdate
    rollingUpdate:
      # This value of maxSurge means that during a rolling update
      # the new ReplicaSet will be created first.
      maxSurge: 50%
  selector:
    matchLabels:
      app: ratelimit
  template:
    metadata:
      labels:
        app: ratelimit
    spec:
      affinity:
        podAntiAffinity:
          preferredDuringSchedulingIgnoredDuringExecution:
          - podAffinityTerm:
              labelSelector:
                matchLabels:
                  app: ratelimit
              topologyKey: kubernetes.io/hostname
            weight: 100
      containers:
        - name: redis
          image: release-ci.daocloud.io/skoala/redis:6.2.6
          env:
            - name: REDIS_SOCKET_TYPE
              value: tcp
            - name: REDIS_URL
              value: redis:6379
        - name: ratelimit
          image: release-ci.daocloud.io/skoala/envoy-ratelimit:v2  # latest a/o Mar 24 2022
          ports:
            - containerPort: 8080
              name: http
              protocol: TCP
            - containerPort: 8081
              name: grpc
              protocol: TCP
            - containerPort: 6070
              name: debug
              protocol: TCP
          volumeMounts:
            - name: ratelimit-config
              mountPath: /data/ratelimit/config
              readOnly: true
          env:
            - name: USE_STATSD
              value: "false"
            - name: LOG_LEVEL
              value: debug
            - name: REDIS_SOCKET_TYPE
              value: tcp
            - name: REDIS_URL
              value: localhost:6379
            - name: RUNTIME_ROOT
              value: /data
            - name: RUNTIME_SUBDIRECTORY
              value: ratelimit
            - name: RUNTIME_WATCH_ROOT
              value: "false"
            # need to set RUNTIME_IGNOREDOTFILES to true to avoid issues with
            # how Kubernetes mounts configmaps into pods.
            - name: RUNTIME_IGNOREDOTFILES
              value: "true"
          command: ["/bin/ratelimit"]
          livenessProbe:
            httpGet:
              path: /healthcheck
              port: 8080
            initialDelaySeconds: 5
            periodSeconds: 5
      volumes:
        - name: ratelimit-config
          configMap:
            name: gateway-rls

---
apiVersion: v1
kind: Service
metadata:
  name: gateway-rls
spec:
  ports:
  - port: 8081
    name: grpc
    protocol: TCP
  - port: 6070
    name: debug
    protocol: TCP
  selector:
    app: ratelimit
  type: NodePort

---
apiVersion: v1
kind: ConfigMap
metadata:
  name: gateway-rls
data:
  ratelimit-config.yaml: |
    domain: gateway-rls.skoala-dev
    descriptors:
      - name: test1
        key: foo
        value: goo
        rate_limit:
          name: test1
          unit: Minute
          requests_per_unit: 20
        descriptors:
          - name: test2
            key: foo1
            value: goo1
            rate_limit:
              name: test2
              unit: Minute
              requests_per_unit: 15
            descriptors:
              - name: test3
                key: foo2
                value: goo2
                rate_limit:
                  name: test3
                  unit: Minute
                  requests_per_unit: 10
接入限流服务器
-
获取上述步骤部署的 gateway-rls 的外部访问地址。
限流服务器地址: 10.6.222.21:32003
限流服务器配置地址: http://10.6.222.21:32004
-
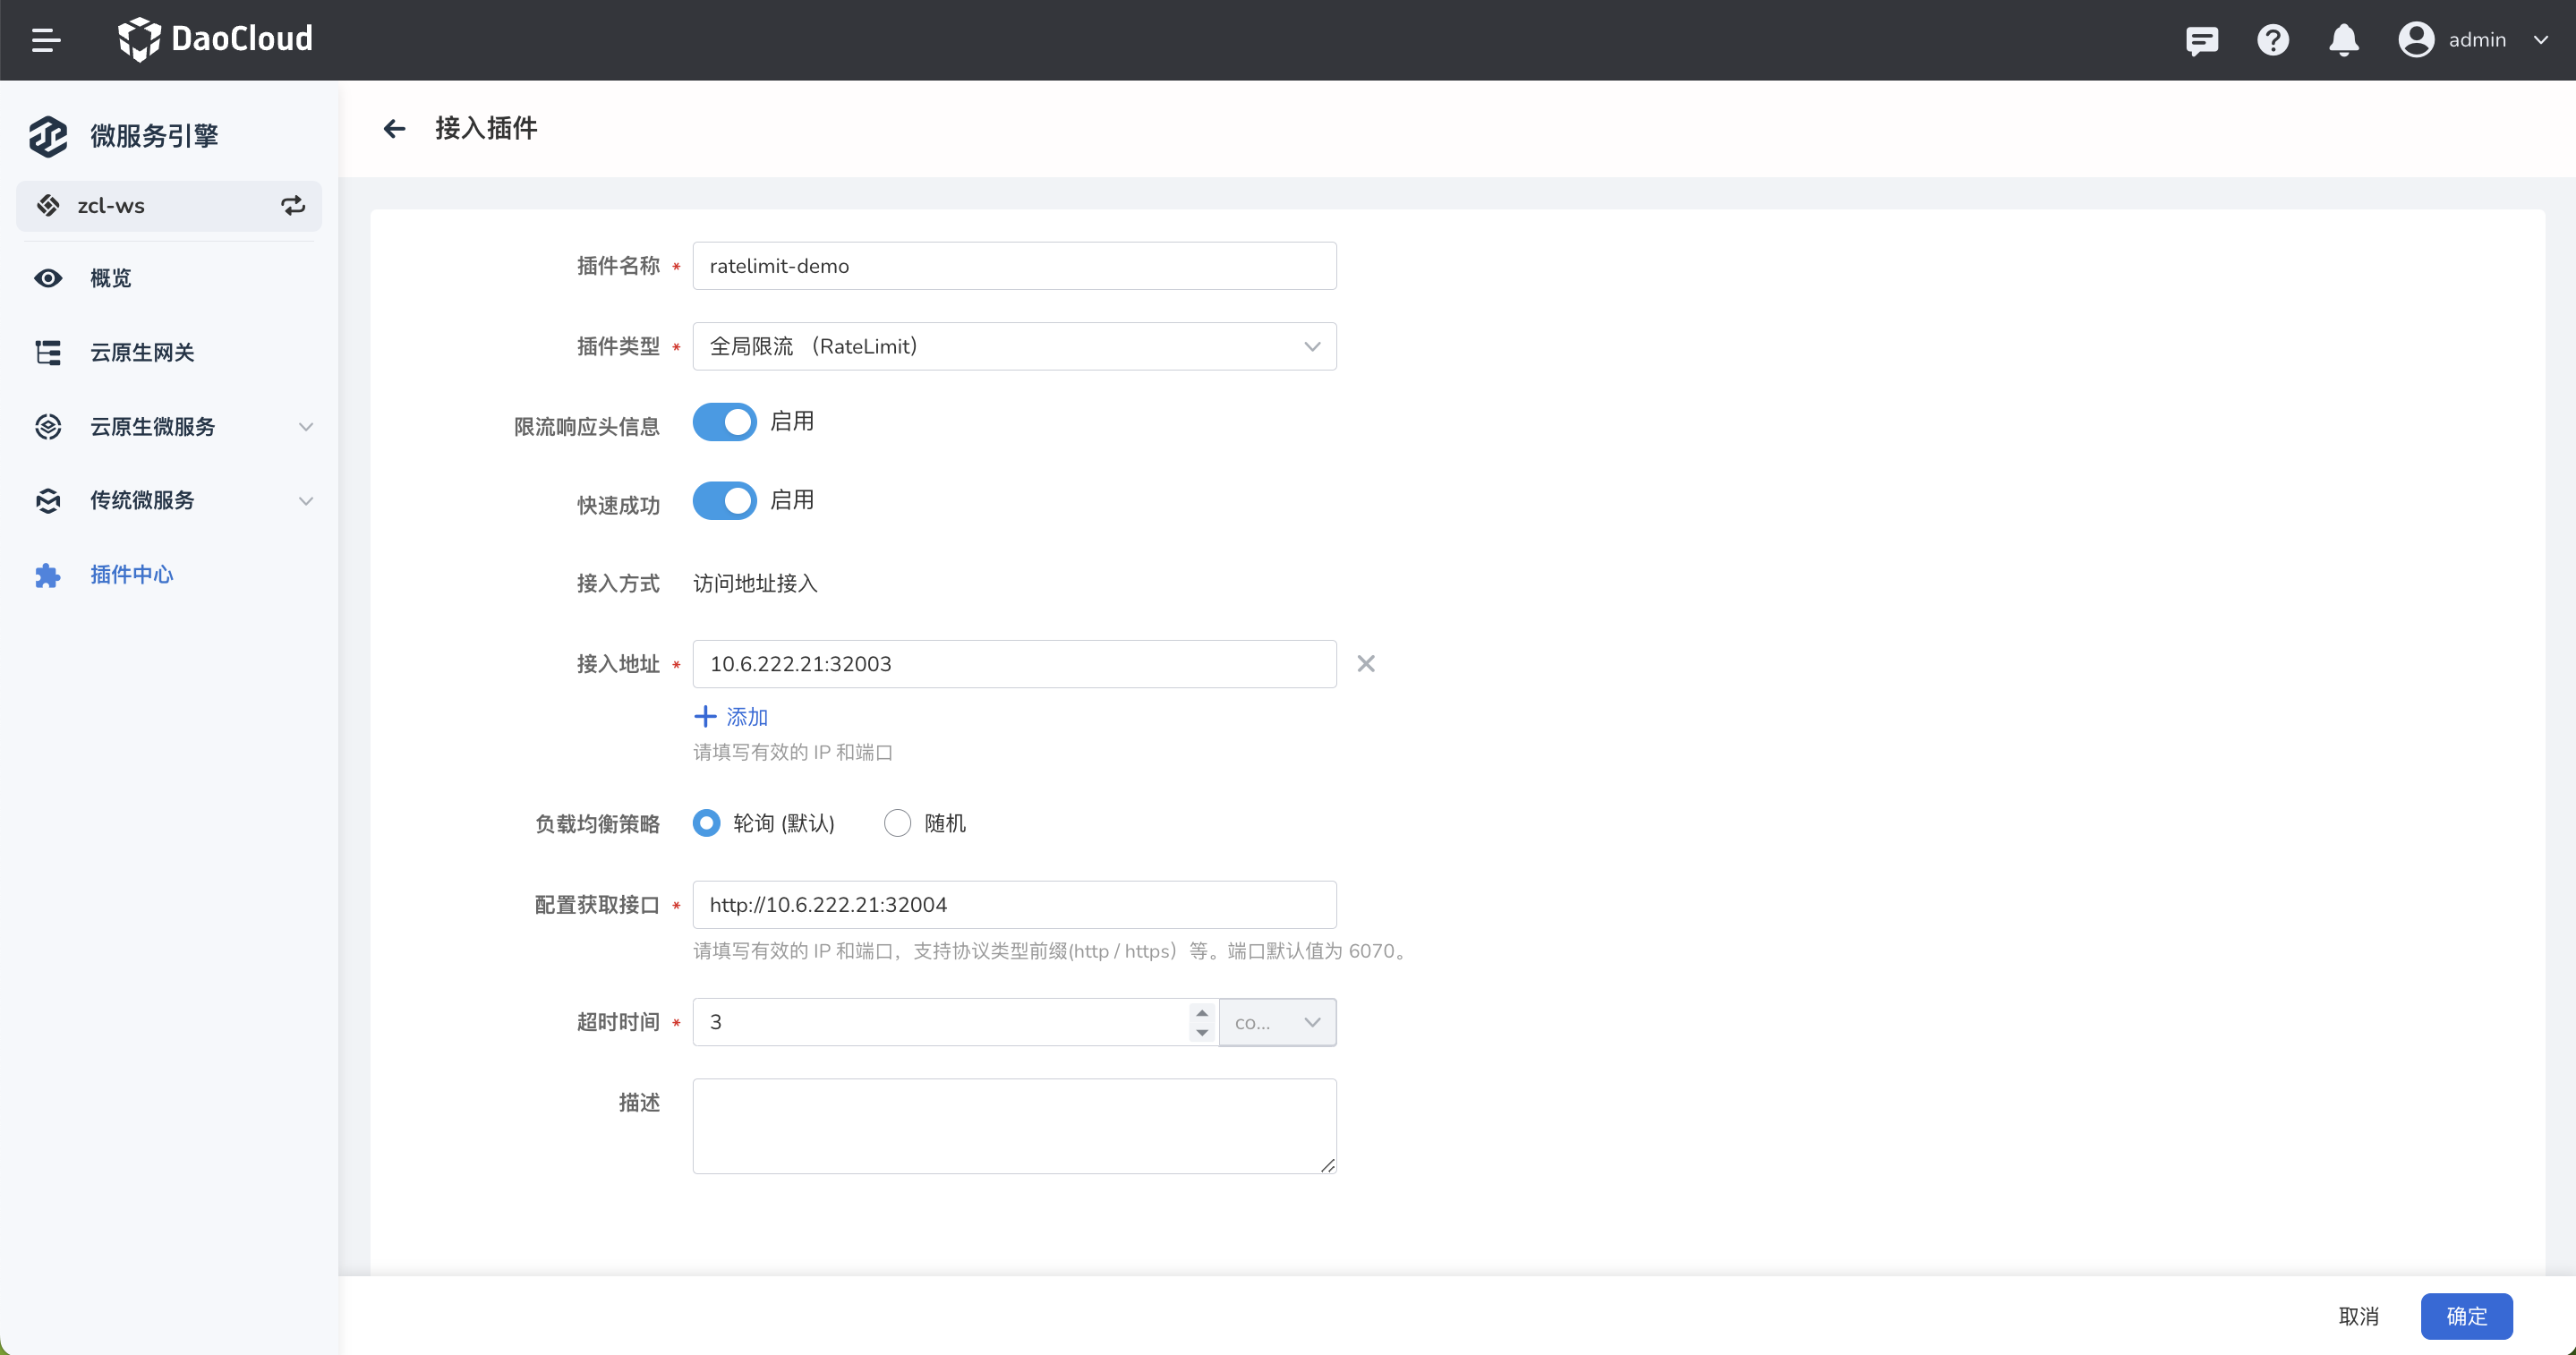
在插件中心创建全局限流插件。
- 限流响应头信息: 是否开启在响应头中打印限流相关信息。
- 快速成功: 当限流服务器无法正常访问时,是否允许继续访问请求。
- 接入地址: 限流服务器的地址,8081 端口对应的地址,协议为 GRPC。
- 负载均衡策略: 当存在多个限流服务器时,多个限流服务器的访问策略。
- 配置获取接口: 获取限流服务器配置的地址,为端口 6070 对应的地址,协议为 HTTP。
- 超时时间: 限流服务器响应的超时时间。
-
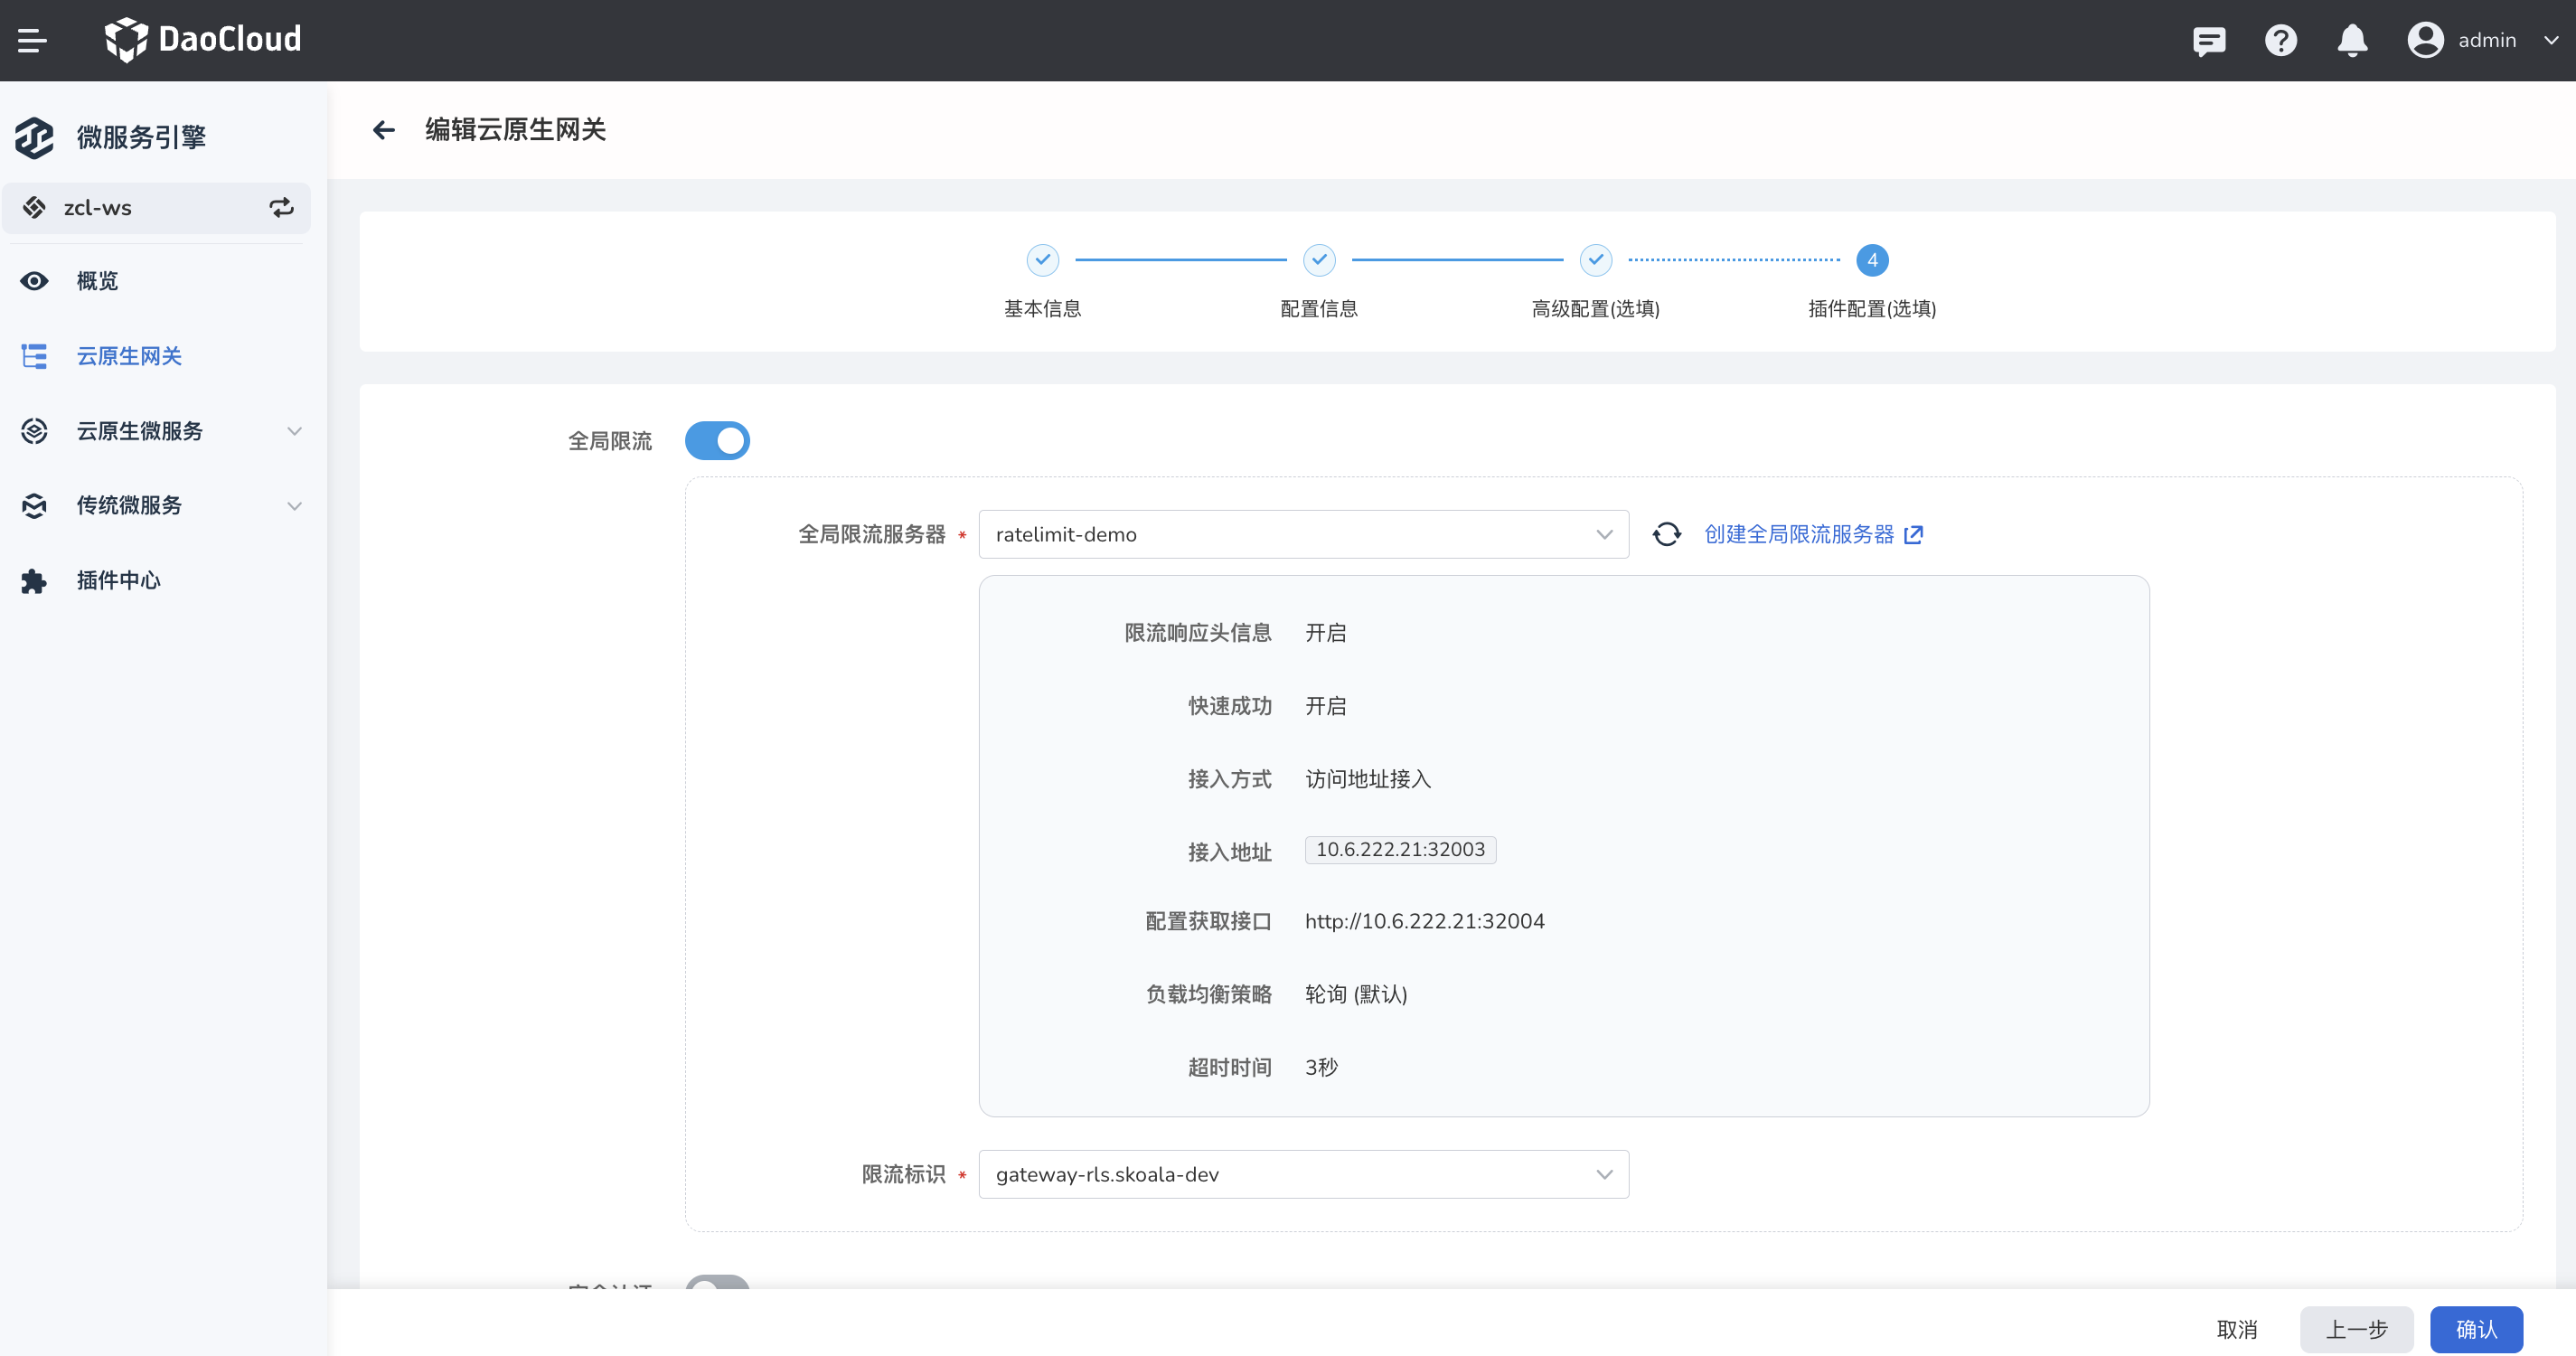
网关配置全局限流插件。
-
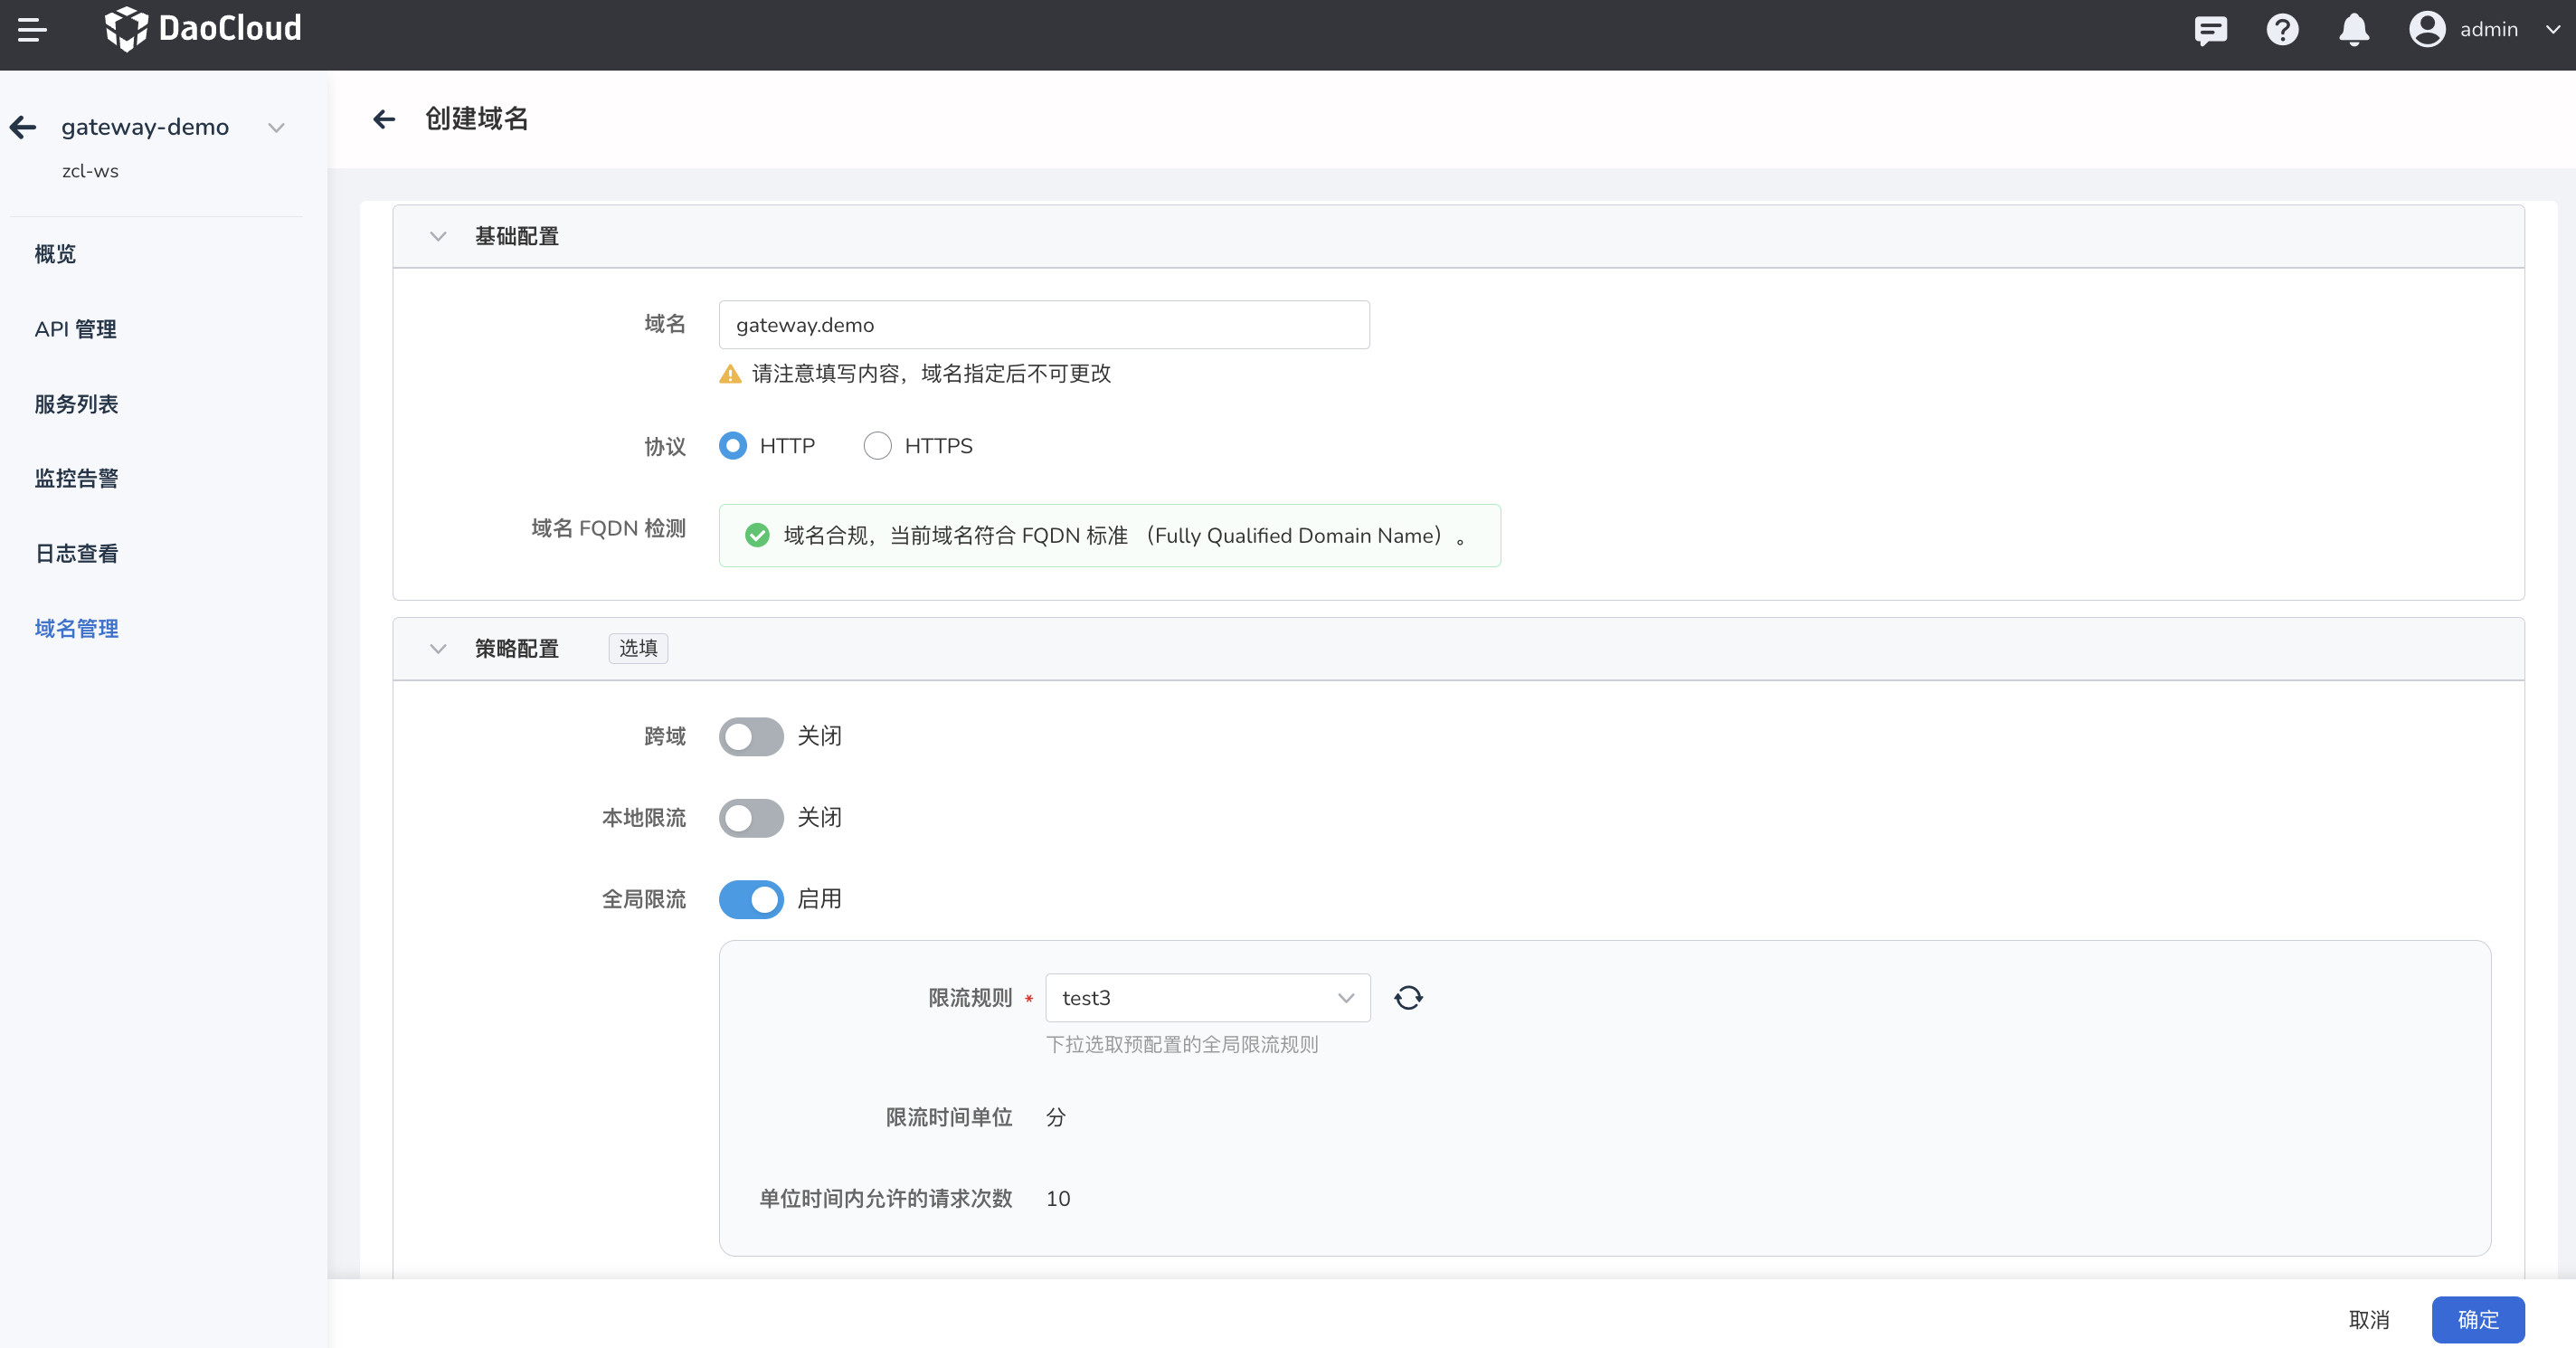
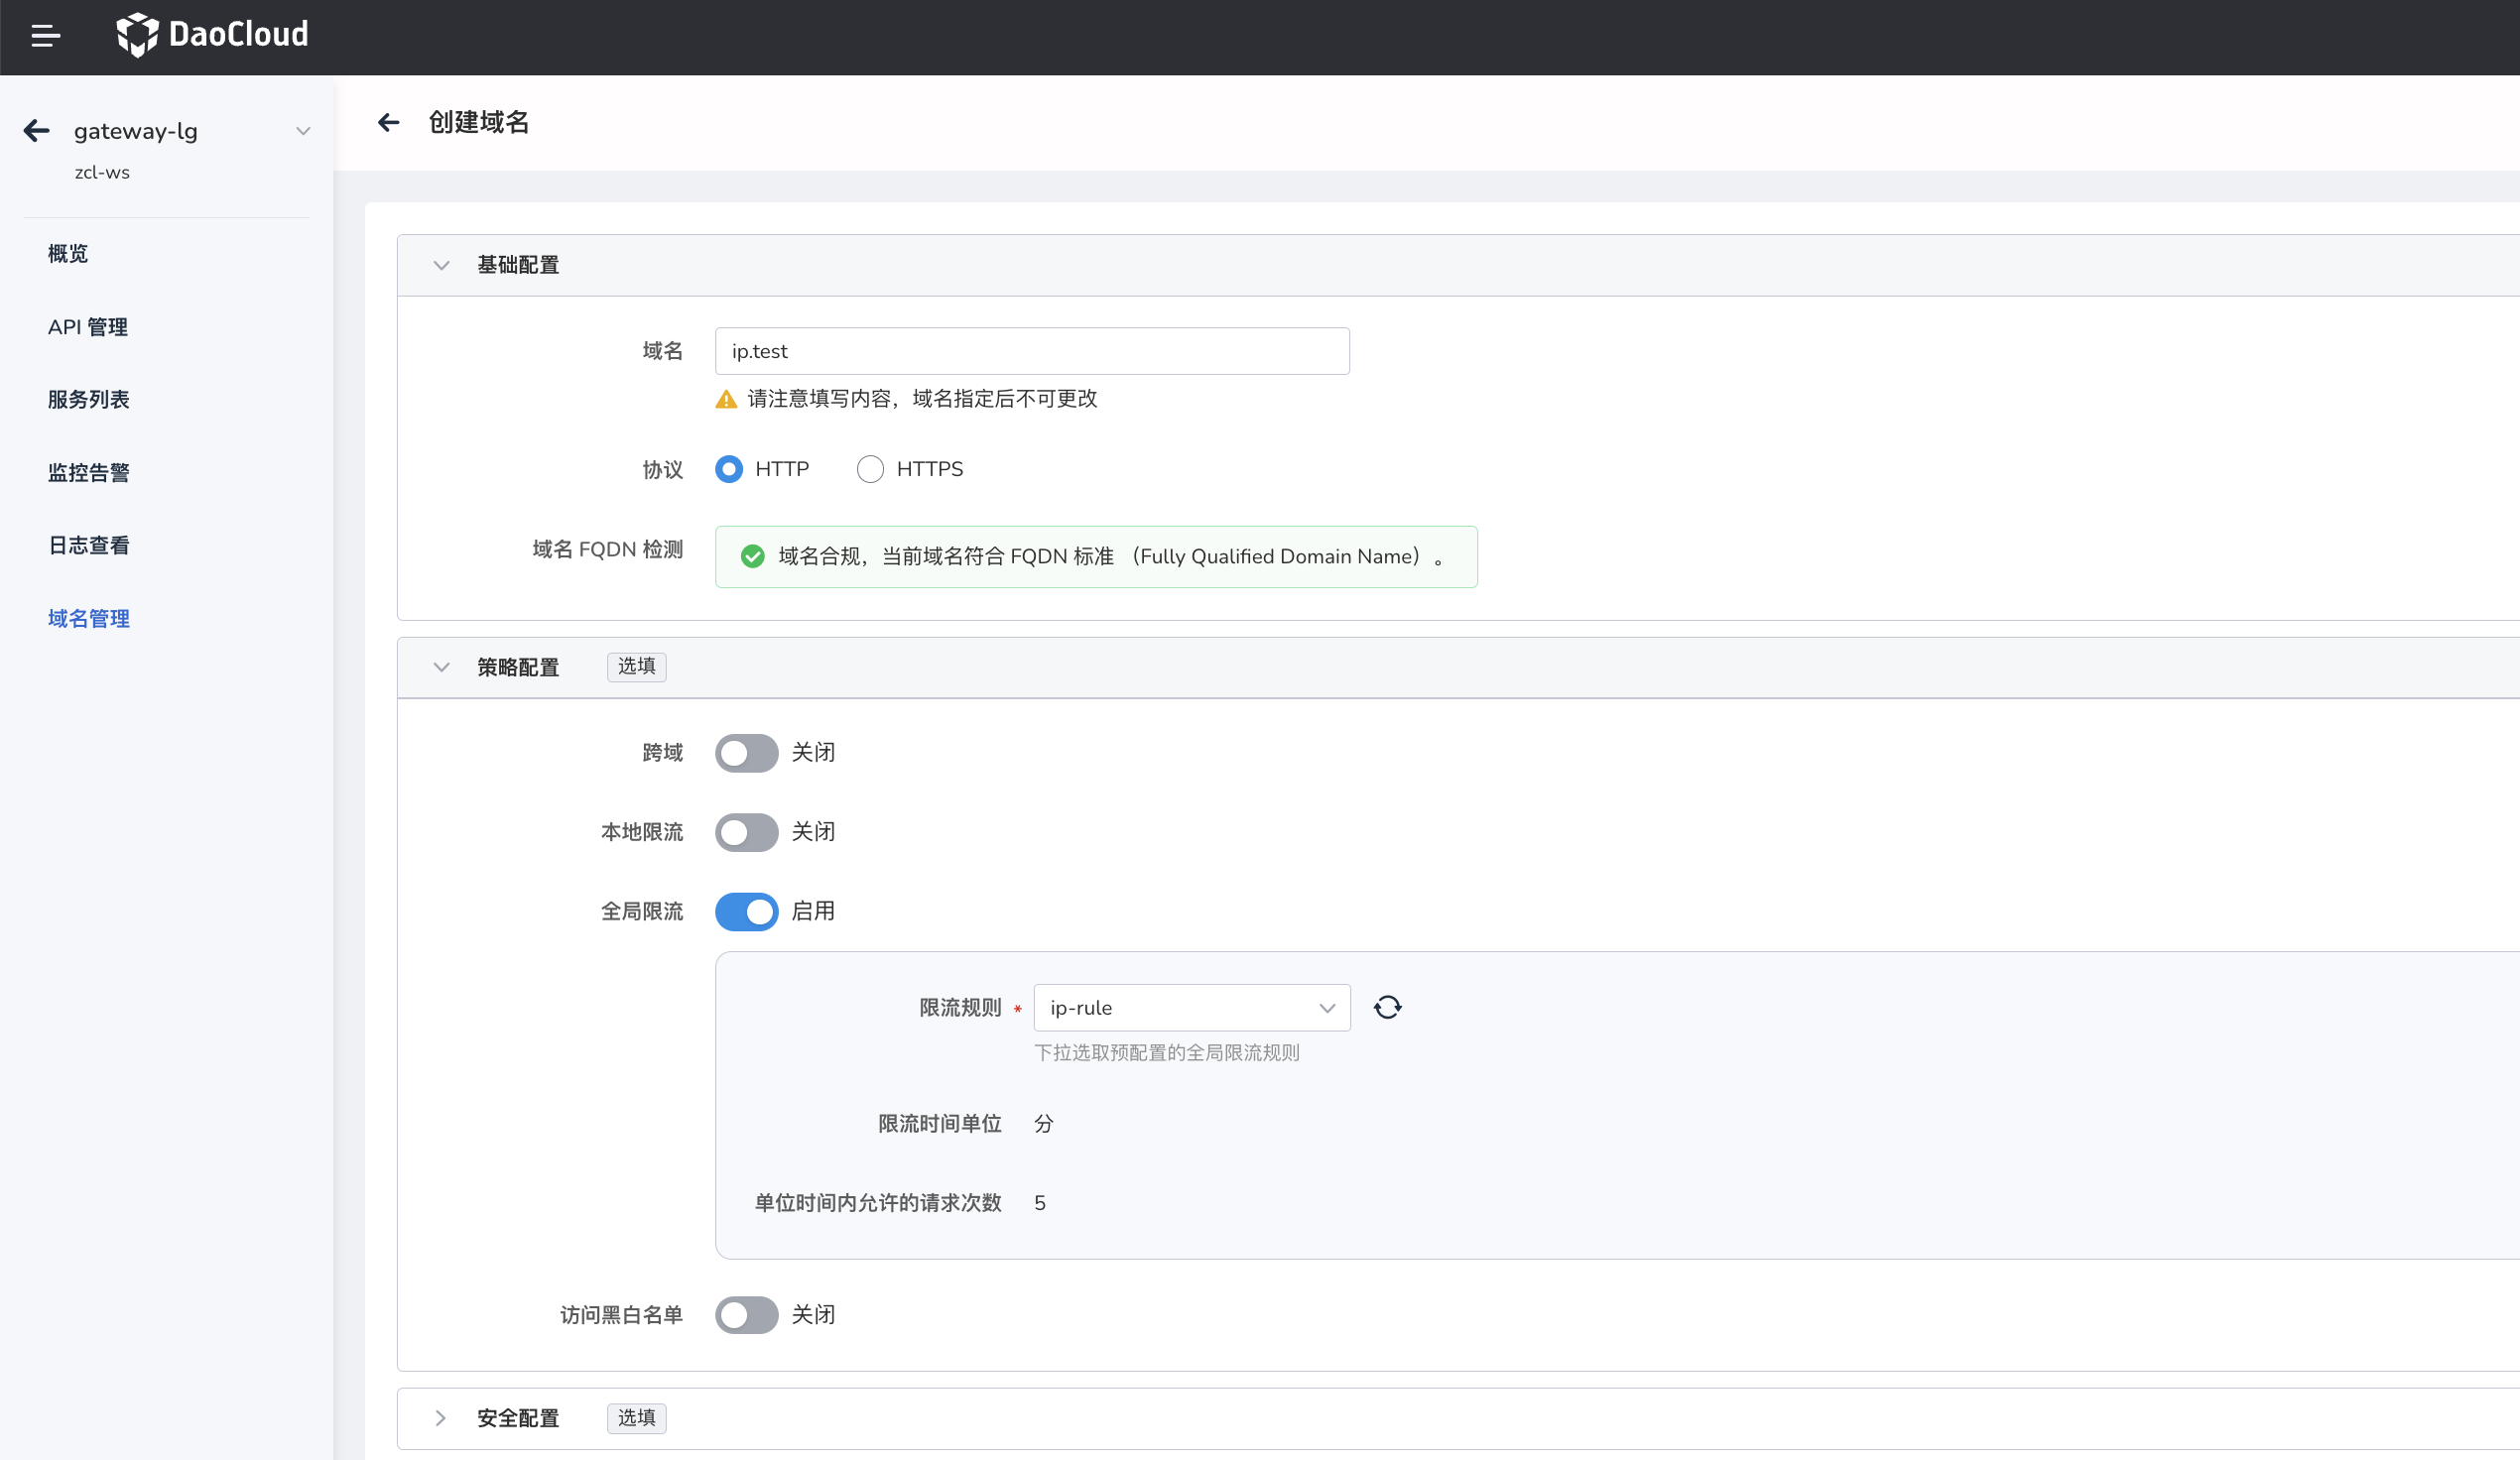
创建域名并开启全局限流。
-
在网关下创建一个 API,
关联域名填写刚才新创建的域名,匹配路径为/,并将 API 上线。API 默认状态是应用域名的全局限流配置,也可以自定义限流规则。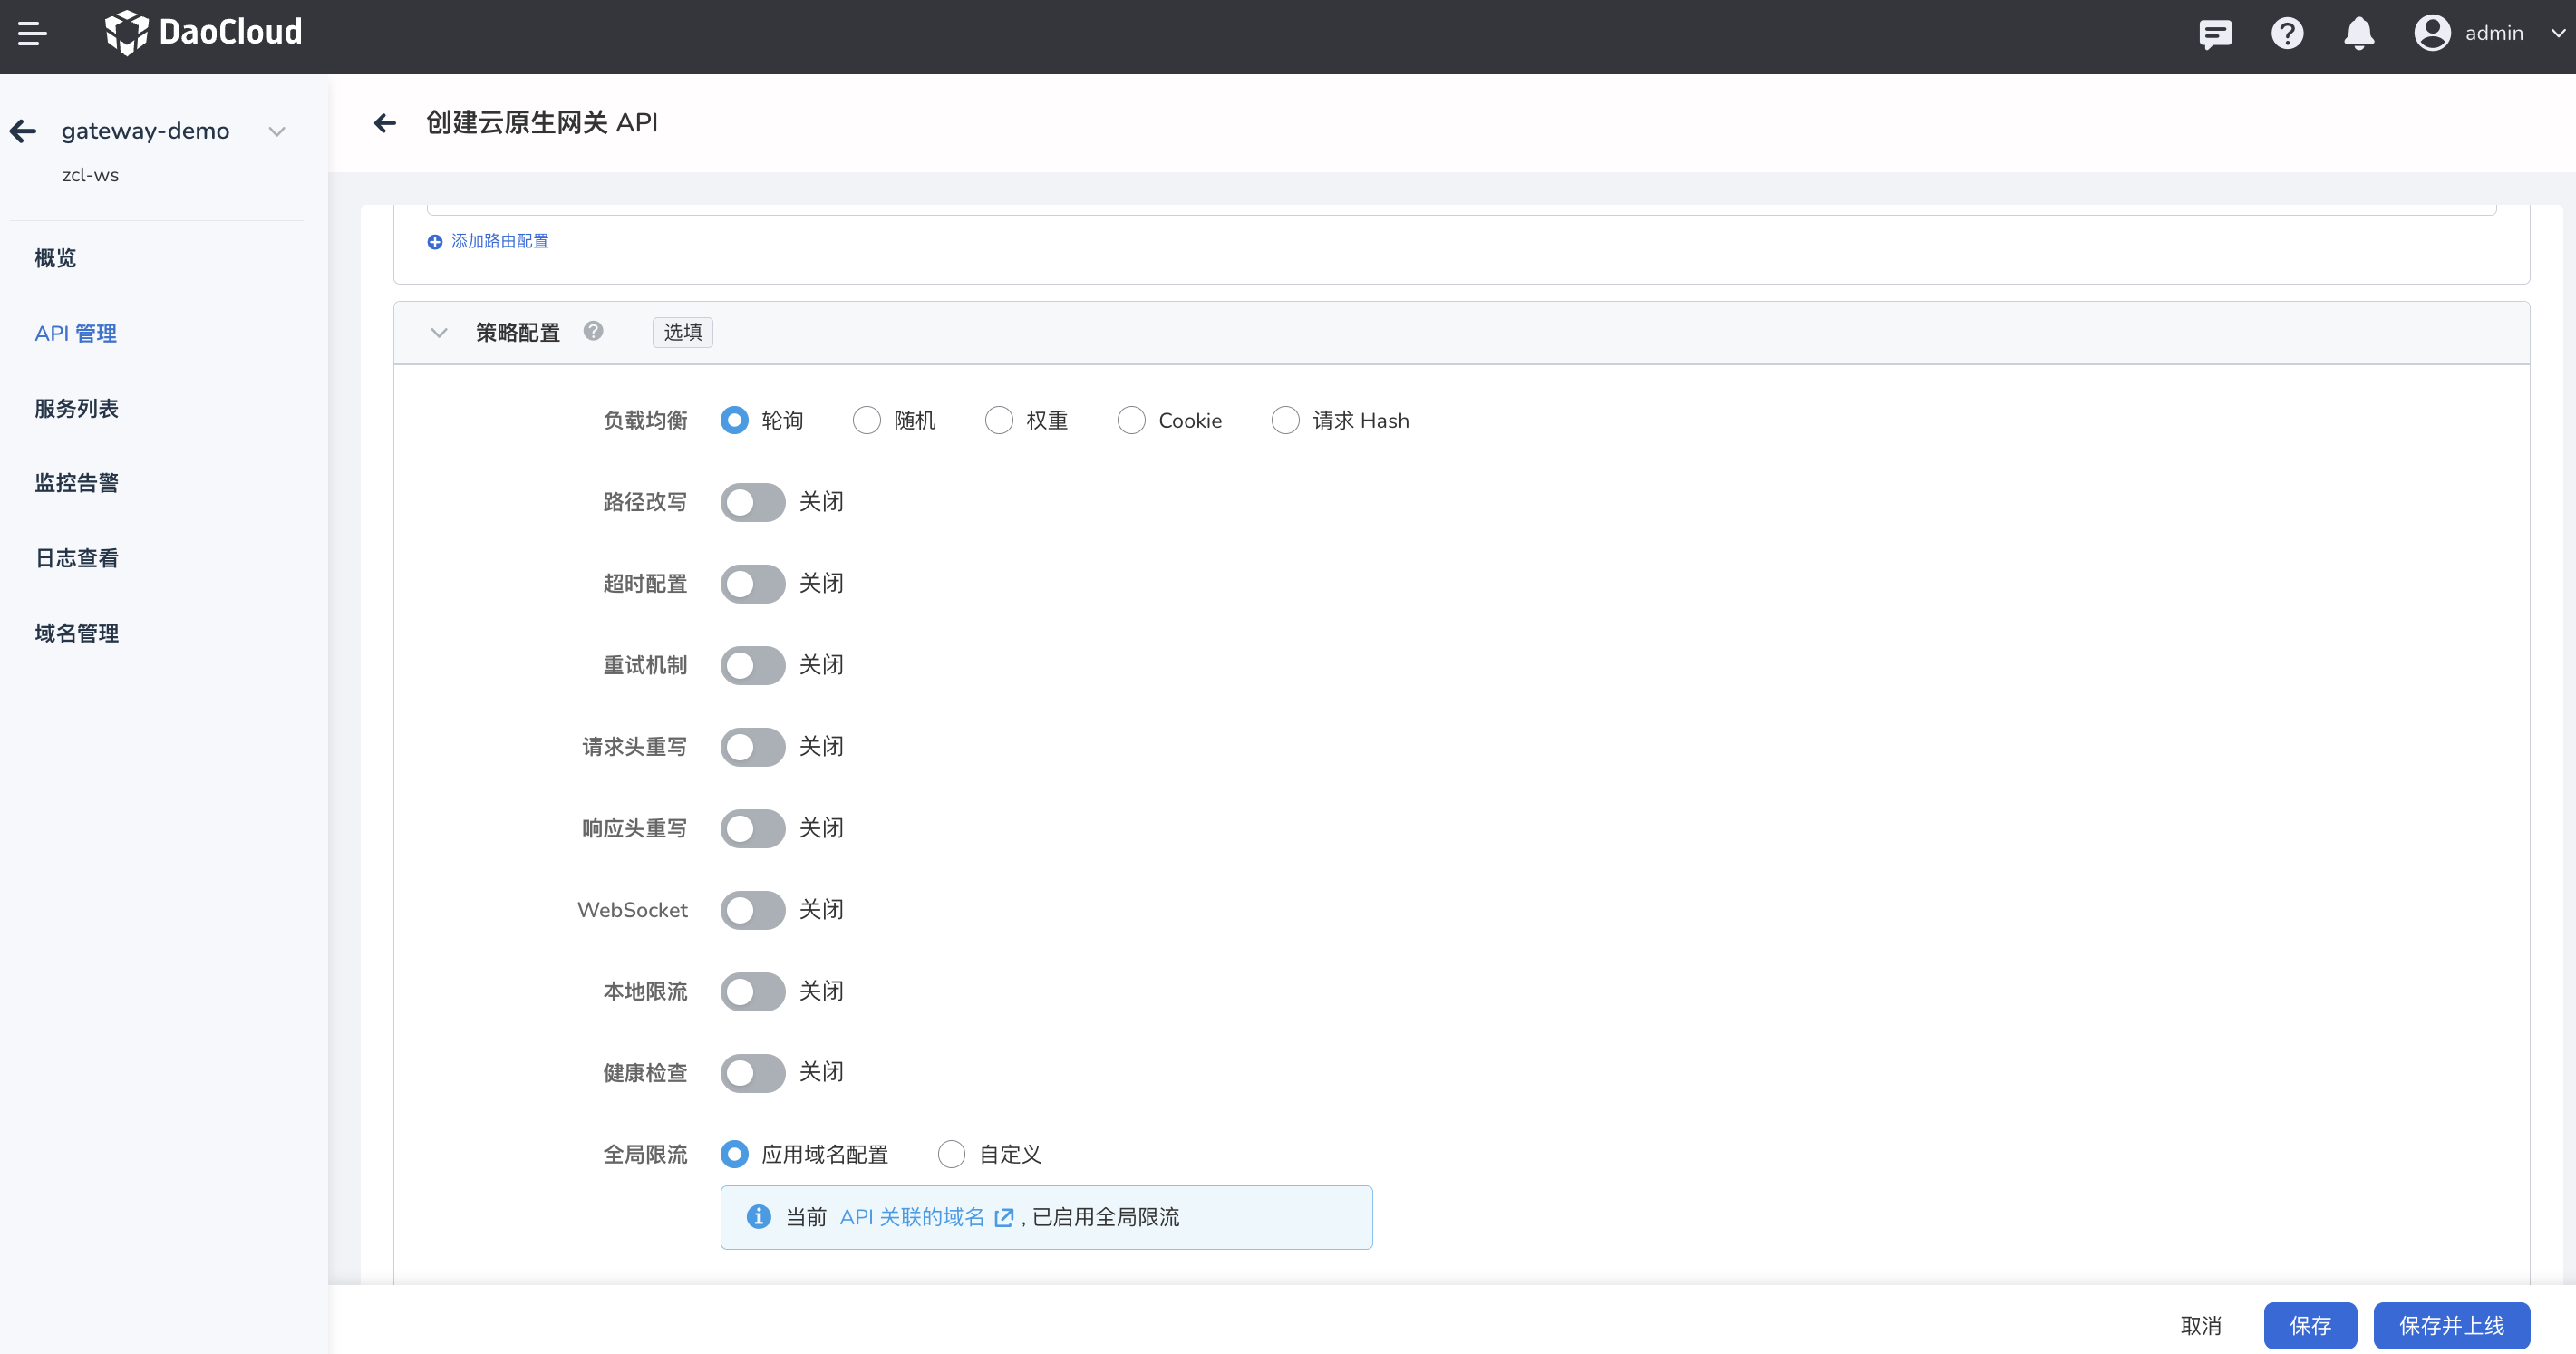
-
现在即可通过限流服务器访问该 API 了。
while true; do curl -w " http_code: %{http_code}" http://gateway.demo:30000/; let count+=1; echo " count: ${count}"; done访问结果如下,可以看到访问 10 次后,就被限流了。
adservice-springcloud: hello world! http_code: 200 count: 1
adservice-springcloud: hello world! http_code: 200 count: 2
adservice-springcloud: hello world! http_code: 200 count: 3
adservice-springcloud: hello world! http_code: 200 count: 4
adservice-springcloud: hello world! http_code: 200 count: 5
adservice-springcloud: hello world! http_code: 200 count: 6
adservice-springcloud: hello world! http_code: 200 count: 7
adservice-springcloud: hello world! http_code: 200 count: 8
adservice-springcloud: hello world! http_code: 200 count: 9
adservice-springcloud: hello world! http_code: 200 count: 10
http_code: 429 count: 11
http_code: 429 count: 12
http_code: 429 count: 13
http_code: 429 count: 14
http_code: 429 count: 15
http_code: 429 count: 16
http_code: 429 count: 17
http_code: 429 count: 18
http_code: 429 count: 19
http_code: 429 count: 20
...
基于 IP 的全局限流
Note
IP 限流规则的 Key 必须填写 remote_address。
针对所有 IP 进行限流
-
编辑限流服务器的 configmap,在 descriptors 添加以下内容(注意格式):
-
限流服务器会热加载配置,等待配置生效即可,当然,也可以访问限流服务器的配置接口,出现以下配置即可。
-
域名配置全局限流策略(当然,前提是网关需要开启全局限流插件)。
-
基于该域名的 API 访问,执行以下命令访问。
while true; do curl -w " http_code: %{http_code}" http://ip.test:30000/; let count+=1; echo " count: ${count}"; done访问结果如下,可以看到访问 5 次后,就被限流了。
adservice-springcloud: hello world! http_code: 200 count: 1
adservice-springcloud: hello world! http_code: 200 count: 2
adservice-springcloud: hello world! http_code: 200 count: 3
adservice-springcloud: hello world! http_code: 200 count: 4
adservice-springcloud: hello world! http_code: 200 count: 5
http_code: 429 count: 6
http_code: 429 count: 7
http_code: 429 count: 8
http_code: 429 count: 9
http_code: 429 count: 10
...
针对指定 IP 进行限流
-
编辑 gateway-rls 的 configmap,在 descriptions 添加以下内容(注意格式):
- 对所有 IP 进行限流,每分钟访问 10 次。
- 对 IP 10.6.222.90 限流每分钟访问 5 次。
- 对 IP 10.70.4.1(本机)限流每分钟访问 3 次。
data: ratelimit-config.yaml: | domain: gateway-rls.test descriptors: - name: ip-rls key: remote_address rate_limit: name: ip-rule unit: Minute requests_per_unit: 10 - key: remote_address value: 10.6.222.90 rate_limit: unit: Minute requests_per_unit: 5 - key: remote_address value: 10.70.4.1 rate_limit: unit: Minute requests_per_unit: 3 -
限流服务器会热加载配置,等待配置生效即可,当然,也可以访问限流服务器的配置接口,出现以下配置即可。
$ curl http://10.6.222.21:32004/rlconfig gateway-rls.test.remote_address: unit=MINUTE requests_per_unit=10, shadow_mode: false gateway-rls.test.remote_address_10.6.222.90: unit=MINUTE requests_per_unit=5, shadow_mode: false gateway-rls.test.remote_address_10.70.4.1: unit=MINUTE requests_per_unit=3, shadow_mode: false -
域名配置全局限流策略。
-
基于该域名的 API 访问,执行以下命令访问。
while true; do curl -w " http_code: %{http_code}" http://ip.test:30000/; let count+=1; echo " count: ${count}"; done在本机执行命令的访问结果如下,访问 3 次被限流。
adservice-springcloud: hello world! http_code: 200 count: 1
adservice-springcloud: hello world! http_code: 200 count: 2
adservice-springcloud: hello world! http_code: 200 count: 3
http_code: 429 count: 4
http_code: 429 count: 5
http_code: 429 count: 6
http_code: 429 count: 7
http_code: 429 count: 8
http_code: 429 count: 9
http_code: 429 count: 10
...
在 10.6.222.90 主机执行命令的访问结果如下,访问 5 次被限流。
adservice-springcloud: hello world! http_code: 200 count: 1
adservice-springcloud: hello world! http_code: 200 count: 2
adservice-springcloud: hello world! http_code: 200 count: 3
adservice-springcloud: hello world! http_code: 200 count: 4
adservice-springcloud: hello world! http_code: 200 count: 5
http_code: 429 count: 6
http_code: 429 count: 7
http_code: 429 count: 8
http_code: 429 count: 9
http_code: 429 count: 10
http_code: 429 count: 11
http_code: 429 count: 12
...
在其他未额外设置限流规则的主机执行命令的访问结果如下,访问 10 次被限流。
adservice-springcloud: hello world! http_code: 200 count: 1
adservice-springcloud: hello world! http_code: 200 count: 2
adservice-springcloud: hello world! http_code: 200 count: 3
adservice-springcloud: hello world! http_code: 200 count: 4
adservice-springcloud: hello world! http_code: 200 count: 5
adservice-springcloud: hello world! http_code: 200 count: 6
adservice-springcloud: hello world! http_code: 200 count: 7
adservice-springcloud: hello world! http_code: 200 count: 8
adservice-springcloud: hello world! http_code: 200 count: 9
adservice-springcloud: hello world! http_code: 200 count: 10
http_code: 429 count: 11
http_code: 429 count: 12
http_code: 429 count: 13
http_code: 429 count: 14
http_code: 429 count: 15
http_code: 429 count: 16
http_code: 429 count: 17
...